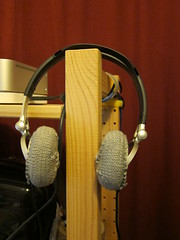
Finished project report! I'm quite pleased with my knitted headphone covers. It was a good experimental knitting project, figuring out how to make the covers and then doing it again and again to get it right. Because it was a trial and error process, at first I didn't think it would be worthwhile to blog the instructions. And besides, just how many people with old headphones would want to knit new covers for them? But then I realized that the knitted covers are a nice way to personalize a mass produced item, and plenty of knitters would like to do that. Even if the instructions for my covers don't work perfectly for someone else's headphones, it would be a place to start. So, here's the tutorial:
Covers for Sony Dynamic Studio Headhones MDR-V300 using 2 1/2 mm knitting needles and a bit of organic cotton yarn
Cast on 58 stitches. Knit a row, then purl a row for 13 rows. (Some people call this stocking stitch, but there seems to be different ways of counting rows of ss. Your headhone covers may need more or less rows to cover- it took me 3 tries to get a good fit.)
Start decreasing. Depending on if your last row was a knit or a purl, do the oposite and purl or knit 9 stitches, then two together, then another 9 stitches, then another two together, until you finish the row. My rows finished with 3 stitches after the last two together stitch. So on the next row, I started with 3 stitches, then 2 together then 8 stitches. This will all vary by size and tension, but here is what I ended up doing:
Row 14: knit 9, knit 2 together,knit 9, knit 2 together, knit 9, knit 2 together, knit 9, knit 2 together, knit 9, knit 2 together, knit 3
Row 15: purl 3, purl 2 together, purl 8, purl 2 together, purl 8, purl 2 together, purl 8, purl 2 together, purl 8, purl 2 together, purl 8
Row 16: knit 7, knit 2 together, repeat to end of row which will be just 3 knit stitches
Row 17: purl 3, purl 2 together, purl 6, repeat to end
Row 18: knit 5, knit 2 together, repeat to end which will be just 3 knit stitches
Row 19: purl 3, purl 2 together, purl 4, repeat to end
Row 20: knit 2 together for entire row
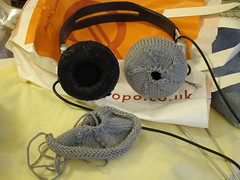
Cast off, leaving a thread long enough to sew up the edges and gather round the ear piece. Check it against the ear piece. It should fit over with just a bit of stretching. If it doesn't fit, note down what to try different and pull it out and start over.
If it does fit, start the sewing up with the thread left at the end, then put the cover on the ear piece to sew it over the wires, then continue the thread around the outer edge gathering it to fit. Tie it off to the thread at the start of the piece and trim or tuck in the ends. Put them on, plug them in and play some good tunes.
Now, that's the way I've done it, but I have a feeling there's loads of tweaks and improvements that could be made. I'm not that great at knitting, so adding patterns, ruffles, tassells, etc. is a bit beyond me, but the headphone covers as an idea could definitely be taken further. Or, the covers can be simple and functional, like mine.
So, for the analysis:
 The good: The covers have made the headphones usable again, which is nice. And I do like the way they are 'peronalized' now.
The bad: Because this project sat in my to-do pile so long (and by that I do mean years), P has new headphones and so doesn't need these now.
The ugly: I am a bit bothered by the way the casting off stitches stand up. This is probably due to my awkwardness in casting off rather than the pattern itself.
No comments:
Post a Comment